How “It works in my machine” turns “It works in my container”?
You had things running with occasional glitches and there was always an excuse “It works in my machine” as there is rarely identical machine & OS for all. So, you need a solution to avoid same excuse when code breaks. Now, someone told about a blue chip solution called “Container” which will have all dependencies packaged, works on any machine, maintains parity on dev to production environment, no conflicts at all. So stay chill !!!

And you started building container images, grabbed the concept of writing Dockerfile, port mapping, package installation commands, decrease image size, follow best practices and yay its real !!!

Gradually, other developers also started using container and after sometime, you started using docker in production. Cool story !!!
But … After a month …
People start to spend an hour daily on fixing container issue. And the voice starts raising — “It works in my container”

So, what happened?
Was it too early to adopt container technologies(like docker hype)? Do you need a professional before diving? Is there any issue from application or flaw in container? No ….
Let’s dive into why the “It works in my container” situation arises
1. Using latest image tag
Yes. It’s number one thing to always keep in mind. While starting to learn we use latest tag of every image. But it’s like to put axe on your own foot. Consider an example:
From node:latestAt the time you started to use docker, the latest tag was for NodeJS version let’s say 10 but after a month when someone formatted her laptop or a new guy is on-boarded, the latest tag is now version 12. But your application is best suite for the previous version. All of the people are using same Dockerfile but this is the reason why you are forced to say loud “It works in my container”.
So, always use versioned tag. Use ubuntu:16.04 or node:12-alpine but never ubuntu:latest or node:alpine
2. Container engine and other environment version:
In case of Docker, it tries to make releases with backward compatibility in concern and feature removal is communicated three releases in advance. This could be a reason if the engine is not upgraded since long time.
If you use Docker Compose, the changes and versioning of yml files is very important. While versioning docker-compose file, its always a good practice to specify minor release. Like, not use version: “3” but version: "3.7" because by default the prior means version: "3.0" and there are many updates on each release of docker-compose which is supported by the upgraded version only. It’s a way to avoid ping. Here is the compose versioning and compatibility matrix guide.
3. Dealing with variables:
In general, we read variables & secret for applications through config file like: config.json or .env . But with docker, there are are multiple ways, that is run time and build time environment variables. A simple way to pass environment variable is:
docker run -it -e KEY=VALUE --name nginx nginx:1.15-alpine /bin/sh -c "env | grep KEY"And through docker compose:
web:
  environment:
    - KEY=VALUE
Additionally, with compose we can pass variables of a file:
web:
  env_file:
    - web-variables.env
Also, we can use variables of file to another key:
web:
  image: "nginx:${NGINX_VERSION}"
In this case, by default compose reads .env file and checks for the value of NGINX_VERSION and adds it.
One major difference in reading directly from file and environment variables is - in case of file, the changes in file are reflected immediately if volume is shared but if we use docker environment variables, it requires docker restart. So, in case of compose:
$ docker-compose restart web
Then only, new variables are available for the environment reading through PROCESS.ENV
Additionally, there’s another variable called ARG which is available only at build time so that the variable is not available during run time. But ENV is available both during build & run time.
4. Image build process:
Official docker images are not always enough. We need some customization and additional packages which takes long time and resources if we do each step on everyone’s system. So, we take a base image and build our own image by customization. Here, manual addition and commit of packages should always be avoided:
$ docker run -it --name alpine alpine:3.8 /bin/sh/ # apk add busybox-extras[CTRL+p CTRL+q]$ docker commit alpine alpine-custom$ docker push alpine-custom
Here, you lost the track of state. Also, the version of busybox-extras that you installed now may not be available later. So, always use Dockerfile with versioning of package:
FROM alpine:3.8
RUN apk add busybox-extras-1.28.4-r3
5. Files and folders permission:
Let’s dive with an example:
#docker-compose.yml
version: "3"
services:
  myapp:
    image: node:11-alpine
    container_name: "myapp"
    volumes:
      - ./:/app
    entrypoint: /bin/sh
    command: -c "sleep 5 && cd /app && yarn && yarn start"
After running docker-compose up -d , let’s check files & folders permission
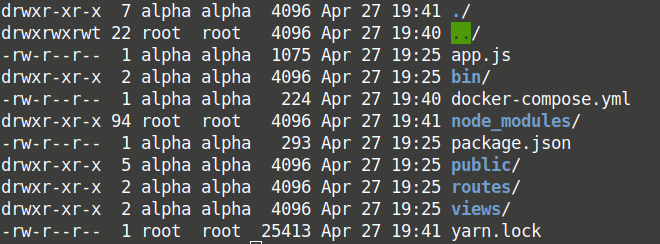
Here, we can see node_modules and yarn.lock is owned by root user as these folder & file were created inside of docker. Similarly, if there are any uploads that would be owned by root(Same issue will arise only on Linux machine but not on MacOS). This will cause problem when you have to edit or add file from host system and also git will detect changes. We cannot afford to change permission each time but bring the owner of every files & folders to current user. Here is how we can do that:
#Updated docker-compose.yml
version: "3"
services:
  myapp:
    image: node:11-alpine
    container_name: "myapp"
    volumes:
      - ./:/app
    entrypoint: /bin/sh
    command: -c "sleep 5 && cd /app && yarn && yarn start"
    user: ${CURRENT_UID}
Export a variable with current user and group id
export CURRENT_UID=$(id -u):$(id -g)And start container
CURRENT_UID=$CURRENT_UID docker-compose up -dNow, we can see all the files and folders owned by current host user.
6. Sharing between host and container volume:
Though docker was introduced with the concept of — run once & run everywhere — while using volumes, there’s difference in case of MacOS. It uses osxfs as shared file system solution on Docker Desktop for Mac edition. While mounting host path inside container, additional step is to be performed. Let’s take an example:
docker-compose.yml
version: "3.2"
services:
  myapp:
    container_name: myapp
    image: node:11-alpine
    volumes:
      - ./:/app
If you run docker-compose up , it will throw error:
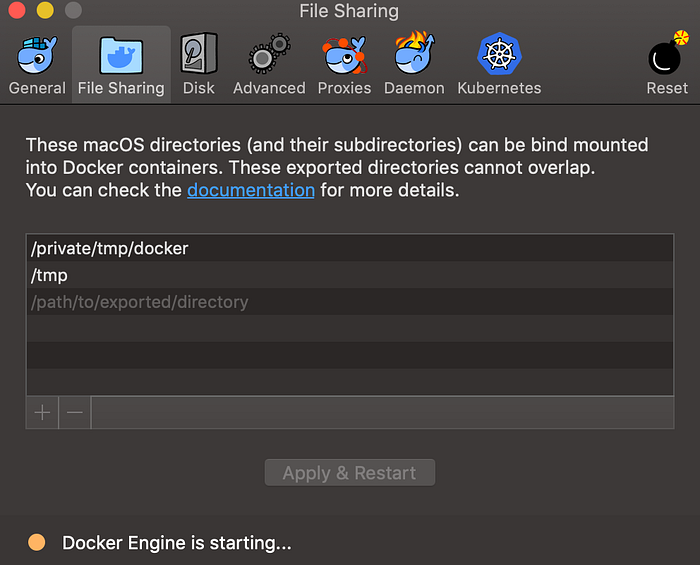
ERROR: for myapp Cannot start service myapp: b'Mounts denied: \r\nThe path /private/tmp/docker/myapp\r\nis not shared from OS X and is not known to Docker.\r\nYou can configure shared paths from Docker -> Preferences... -> File Sharing.\r\nSee https://docs.docker.com/docker-for-mac/osxfs/#namespaces for more info.\r\n.'But with same case, it runs fine on Linux environment. For mac, the path has to be added from Docker preferences menu -> Preferences -> File sharing.
Also, if there is hard coded volume path, its common to create problem for other users.
There are other issues which might arise like:
- Port conflict if you have any processes running on host machine and docker uses same port
- Proxy or load balancer used for sending traffic to different containers based on virtual hosts urls. There might be upload limits, additional or modified header sent by proxy
- Using dual packages: host installed and from inside docker commands which could have different versions.
If you have any issues faced while running applications on container which raised “It works in my container” talk, feel free to share on comment.
Feel free to connect with me on Linkedin, Twitter where I share interesting updates.