Securing HashiCorp Vault with Let’s Encrypt SSL
This is my second post about Hashi Vault. You can read my first post about handling mysql passwords dynamically.
Vault manages your secret whether it be static or dynamic, it has its own encryption mechanism but how can it be trusted when the connection between client and the vault server is itself naked?
Simply, I have unsealed vault which I am browsing on plain http

Now, if I enter the unseal keys here, that can easily be intercepted. The case is common when requesting new secret also.
Implementing VPN or secure server for accessing vault is best recommended.
What we will do in this post?
- Install Let’s Encrypt certbot and generate certificate
- Install and configure vault using systemd.service
- Initialize vault operator and automate unseal
- Link Let’s Encrypt cert renewal with vault service
Let’s dive into each segment. To make it easier for reading configuration on all devices, will be adding screenshot from github with link at bottom.
1. Let’s Encrypt Certbot Installation and Cert Generation
Certbot is popular client for fetching and configuring Let’s Encrypt SSL certificate in no time along with easy renewal. Its well integrated with popular servers (nginx, apache, haproxy etc.). The detailed installation instruction for all popular servers and OS is on this instruction page. But for now, I am showing demo for ubuntu:16.04 system:
$ sudo apt-get update
$ sudo apt-get install software-properties-common
$ sudo add-apt-repository ppa:certbot/certbot
$ sudo apt-get update
$ sudo apt-get install certbot
Considering vault.example.com is our vault UI endpoint, we can generate the certificates with this simple command:
sudo certbot certonly --standalone -d vault.example.comIt will ask for few confirmations and email.
The generated cert and private key path is on the following file format which we will need in next step:
Cert: /etc/letsencrypt/live/vault.example.com/fullchain.pem
PrivKey: /etc/letsencrypt/live/vault.example.com/privkey.pem
2. Install and configure vault using systemd.service
The precompiled binaries of vault is available on download page for different OS and also you can compile it by your own. For Ubuntu distro, download the zip archive and extract. Then move it to /usr/local/bin/ folder. Confirm the installation:
$ vault -v
Vault v0.11.2 ('2b1a4304374712953ff606c6a925bbe90a4e85dd')
Its easy to start vault in dev mode with simple command vault server -dev which is easy way to experiment but not for production or any secure usage as it has too loose access and have in-memory storage. So, for using vault in production, we need to handle the processes of vault service. For ease, we are using systemd which makes it easy to start a process, supervise it and also eases resource control. Its universally available on almost all distros. Create new file named vault.service as path: /etc/systemd/system/vault.service . The gist is on this link.
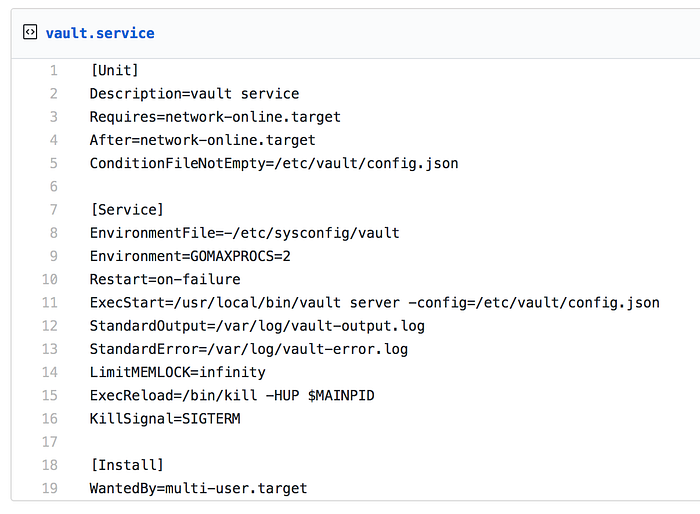
The line ExecStart line clearly shows the vault installation path and the location of config file.
ExecStart=/usr/local/bin/vault server -config=/etc/vault/config.json
Let’s keep this simple vault config file on the above location(Gist Path)
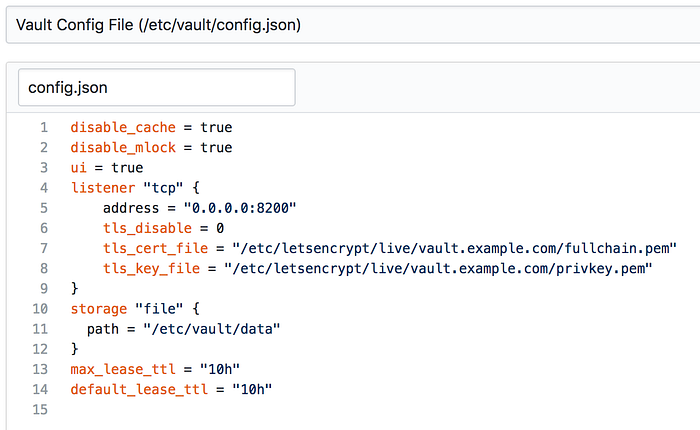
We have used the storage backend as file for ease but there are many persistent storage backends like: Consul, S3, DynamoDB, Google Cloud Storage etc.
Now, lets start and enable the service to start on boot:
$ sudo systemctl start vault.service
$ sudo systemctl enable vault.service
Check status:
$ sudo systemctl status vault.service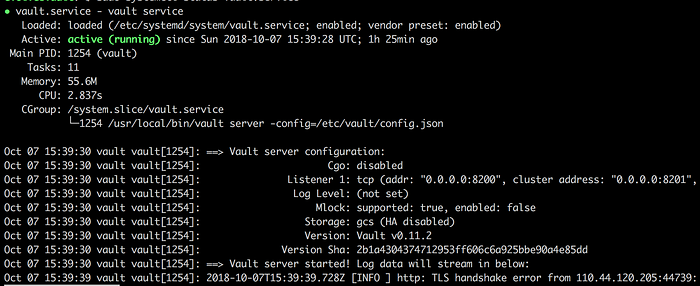
Now, we can easily access vault using url: https://vault.example.com:8200. Confirm it:
$ curl -XGET https://vault.example.com:8200/v1/sys/health
{"initialized":true,"sealed":true,"standby":true,"performance_standby":false,"replication_performance_mode":"unknown","replication_dr_mode":"unknown","server_time_utc":1538932014,"version":"0.11.2"}
3. Initialize vault operator and automate unseal
As we can see the vault is not initialized. We need to make it ready for secret service :)
When we initialize vault, it gives 5 unseal keys and 1 root token. By default, we need 3 unseal keys to unseal vault. Its strictly not recommended to keep the unseal keys on the same server where vault is configured but for the purpose of clearing the air, I am dumping the keys on a file.
$ vault operator init | sudo tee /etc/vault/init.fileThe above command initializes vault and sends the output to /etc/vault/init.file . Now we can unseal the vault with vault operator unseal and enter any of the 3 unseal keys. But for a simple automation, the following command also unseals the vault:
egrep -m3 '^Unseal Key' /etc/vault/init.file | cut -f2- -d: | tr -d ' ' | while read key; do vault unseal ${key}; doneIt simply enters first 3 unseal keys automatically and gets vault out of sealed state.
4. Link Let’s Encrypt cert renewal with vault service
Now, vault is installed and you can also access it through web URL and also send request from cli but the SSL certs we generated earlier from Let’s Encrypt Certbot is valid only for 3 months. We might need to manually renew the certificate, reload vault, unseal it and so on. But let’s automate it through cron(maybe weekly):
sudo certbot certonly --standalone -d vault.axiatancell.com --deploy-hook "sudo systemctl restart vault.service && egrep -m3 '^Unseal Key' /etc/vault/init.file | cut -f2- -d: | tr -d ' ' | while read key; do vault unseal ${key}; done"Yay !! We encrypted the communication to vault.
In the next post about vault, I am thinking of talking about OTP for SSH access. Are you interested?